
Assembly Video
Assembly is simple. This time-lapse video illustrates the process of assembling a 32” x 48” base, that uses two layers of foam floats and spacers. The last step is to attach the avian guard, which can be done lakeside to facilitate transport.
Basic Raft: Materials List

The Basic Raft kit contain three pieces of trap wire: the pre-bent bottom and top of the base, and the avian guard. Dimensions vary slightly with particular raft style. Flotation is provided with flexible oyster floats. Kits ordered with extra flotation will contain a layer of “skinny” floats that are 1/3 the height of the large floats. Four eco composite beams are used as stiffeners. Stainless steel hog rings (1/2” for joining two pieces of trap wire and 3/4” for joining 3) are also included. Not included, but may be ordered: hog ring pliers and oyster bags that can be used to cover the trap wire on the interior of the raft.
Basic Raft: Assembly Instructions
The instructions below are for a 36” wide base. If you are building a 32” wide raft, simply ignore the “sideways” float, and reduce the width of the oyster cloth by 4”.

1. Lay the trap wire base bottom (folds along the 48” side) on a flat surface. Fill the bottom layer with eco composite stiffeners and foam floats according to the the pattern shown in the photo above: stiffener, 3 floats, stiffener, 5 floats, stiffener 3 floats. There will be space for one row to be oriented sideways sideways. Using a knife or handsaw, cut the foam to fit between the stiffeners .
2. If extra flotation is desired place a layer of the “skinny” beams overtop of the first layer. This will consist of 12 flat beams parallel to the short edge and 1.5 beams placed “sideways.” If not using skinny beams for extra flotation, eco composite spacers can be used to keep the foam layers in place.

3. Place an additional layer of full-sized floats in the same pattern as above: 12 floats parallel to the short edge and 1.5 beams placed “sideways.”
4. Lower the trap wire top in place and secure with stainless steel hog rings placed approximately every 6” along all seams. Begin attaching the hog rings at opposite corners, to work the trap wire into a neat rectangle before securing the sides. This completes the base structure.
5. Attach the avian guard to one side of the base, placing rings along both the top and bottom edges of the base about every six inches. Use the larger (3/4”) rings when cinching three pieces of trap wire together. Bracing the raft against a vertical surface may be helpful when attaching the second side,
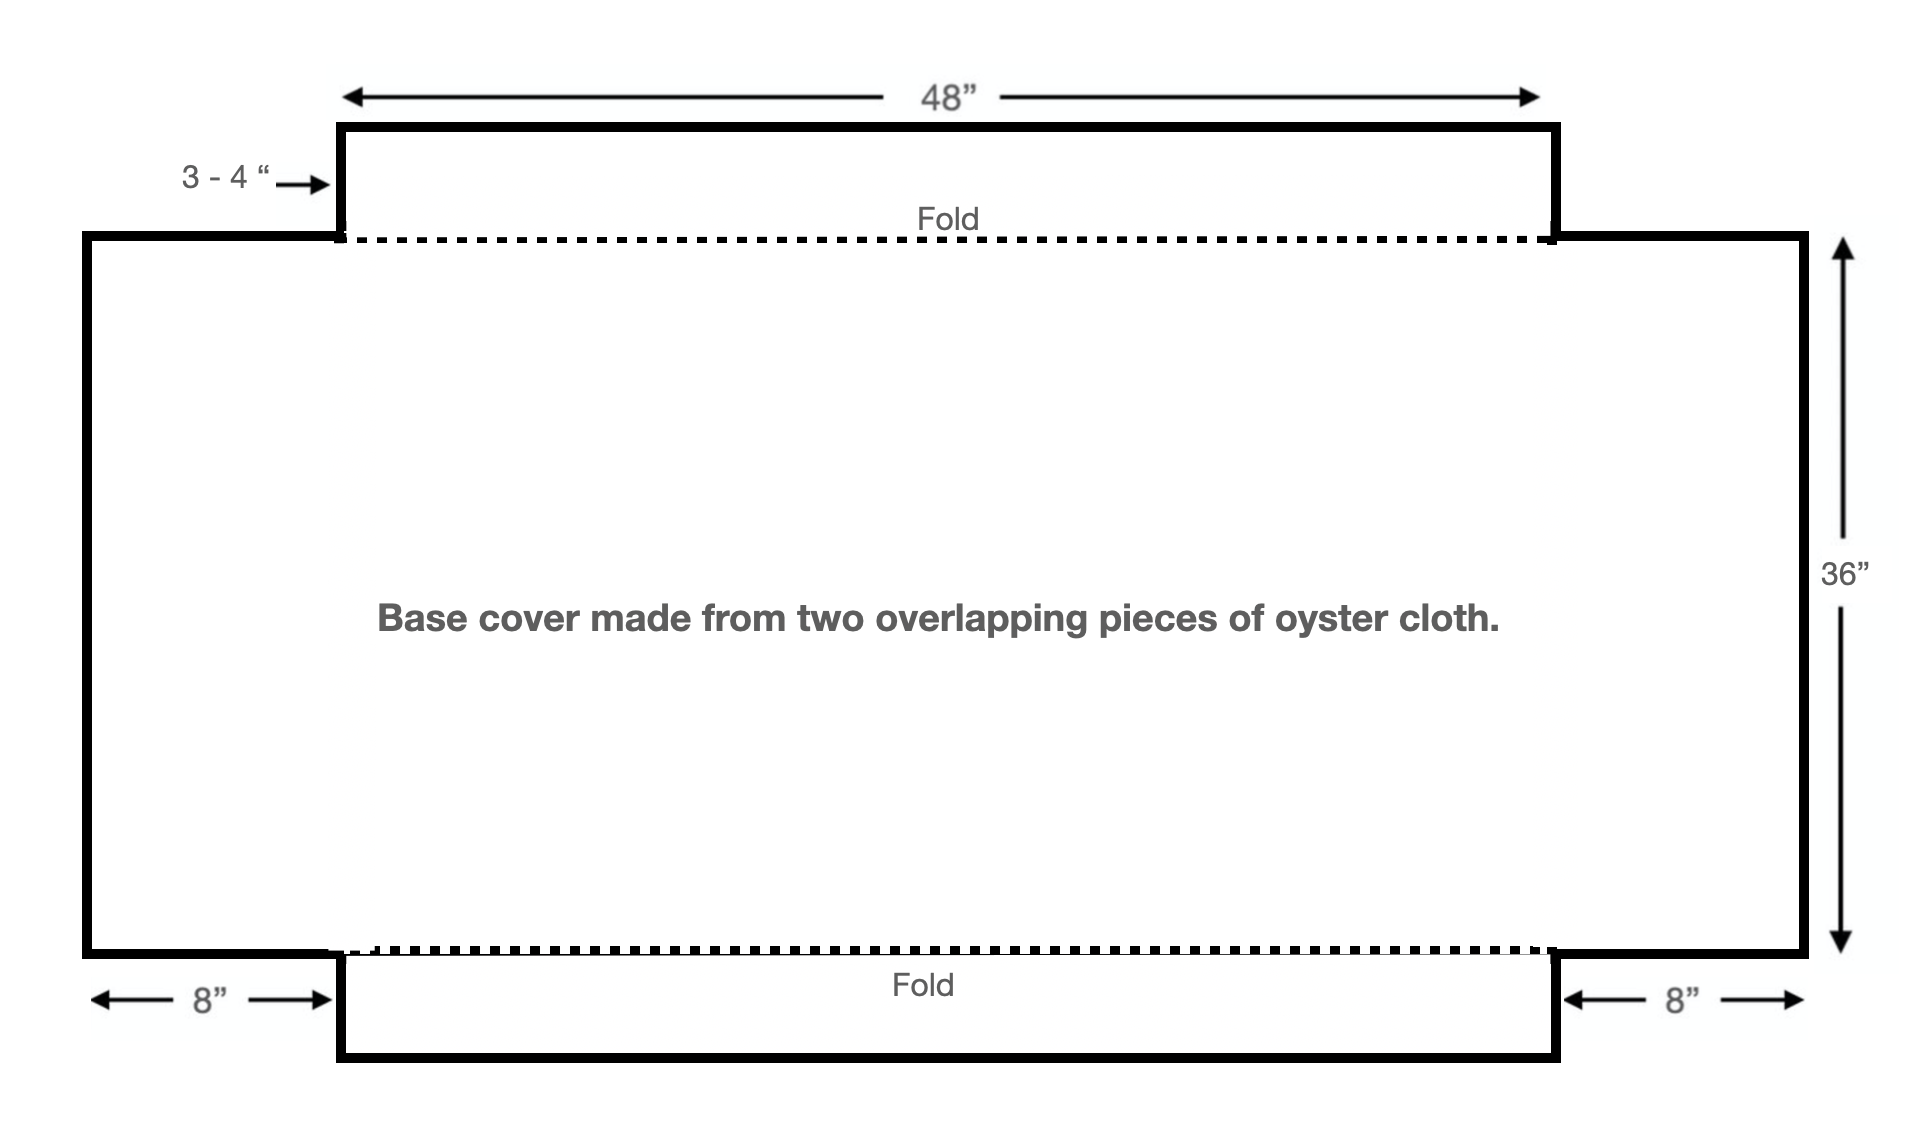
6. In order to keep chicks from getting caught in the avian guard, and to provide a smooth surface in case the birds use the surface of the base as the nest bowl bottom, it is a good idea to cover the base with a layer of mesh as pictured above. We recommend Portland Trap’s oyster bags, which need to be cut open to lay flat. Two overlapping oyster bags will be needed to cover each raft. The combined outer dimensions are shown in the diagram above.
The mesh should have an upturned edge of 3-4” along the avian guard and a flap that folds over the front and back entrances (or just one end if mammalian guard is used.). The mesh can be secured with small zip-ties or sewn in place with galvanized wire. The ends can be allowed to bow outward a few inchesforming a rounded bull nose, which acts as a ramp. If a mammalian guard is used, it is not necessary to have a ramp on both ends.
Note that some builders choose to skip the mesh covering because they have a planting strategy that keeps the base and lower end of the avian guard sufficiently covered with plenty of soil and deeply rooted plants.
Open Top Raft: Material List

The Open Top Raft kit contains the following trap wire components: the pre-bent bottom and top of the base, two planting boxes and four end caps for the planting boxes. The base is 36” x 48” and planting boxes are 6” x 48,” so the overall dimension of the completed raft is 48” x 48”. Flotation is provided by flexible oyster floats in two sizes: 2” x 4” x 32” and “skinny” floats that are 1/3 the height of the large floats. Five eco composite beams are skewered through the trap wire, acting as stiffeners and planting box supports. Stainless steel hog rings (1/2” for joining two pieces of trap wire and 3/4” for joining three) are also included. The following are not included in the kit, but may be ordered: hog ring pliers and oyster bags that can be used to cover the trap wire on the interior of the raft
Open Top Raft: Assembly Instructions

Watch the Basic Raft Base assembly video to get the an overview of the process, noting that this base will use eco composite beams that pass through the wire base, rather than just sitting inside it. It will also have fins that extend upwards on the two long sides that are used for attaching the planting boxes
Thread 5 eco composite beams through the trap wire in the following pattern: beam, 2 foam, beam, 3 foam, beam 3.5 foam, beam, 2 foam, beam. Cut two foam beams to fill the gaps in the perpendicular direction, as shown above
Place a layer of the “skinny” beams overtop of the first layer. This will consist of 12 flat beams parallel to the short edge and 1.5 beams placed “sideways.”
Place an additional layer of full-sized floats in the same pattern as above: 12 floats parallel to the short edge and 1.5 beams placed “sideways.”
Lower the trap wire top in place and work around the edges and corners until the wire meets the trap wire bottom along all edges. This can take a little coaxing. Beginning at opposite corners, secure the two pieces of trap wire together with stainless steel hog rings placed approximately every 6” along all seams. These joints should be tight. This completes the base structure. It should appear as a solid rectangle with fins sticking up on its long edges that will be used to attach the planting boxes.
6. In order to keep chicks from getting caught in the avian guard, and to provide a smooth surface in case the birds use the surface of the base as the nest bowl bottom, it is a good idea to cover the base with a layer of mesh as pictured above. We recommend Portland Trap’s oyster bags, which need to be cut open to lay flat. Two overlapping oyster bags will be needed to cover each raft. The combined outer dimensions are shown in the diagram above.
The mesh should have an upturned edge of 3-4” along the avian guard and a flap that folds over the front and back entrances (or just one end if mammalian guard is used.). The mesh can be secured with small zip-ties or sewn in place with galvanized wire. The ends can be allowed to bow outward a few inches forming a rounded bull nose, which acts as a ramp. If a mammalian guard is used, it is not necessary to have a ramp on both ends.
Note that some builders choose to skip the mesh covering because they have a planting strategy that keeps the base and lower end of the avian guard sufficiently covered with plenty of soil and deeply rooted plants.
Extra-deep base: 4”x 32”x 6”
The extra-deep base uses three layers (6”) of foam and provides an additional 60 lbs of buoyancy over the 2.3 layer base. Stiffeners are arranged in the same pattern as above with and run through either of the two central rows of squares, depending on desired height. All remaining assembly instructions are the same as for the Open Top Base.
Planting Boxes (2): Materials List


Planting Boxes: Assembly Instructions
The planting boxes are assembled by attaching the 6” square end caps to the 48” planter. Once the ends are in place, the boxes are lined with very heavy duty landscape felt that is cut to fit. If using cloth that is longer than 48”, ends can be folded inward to form a seamless rectangle. Otherwise patches with at least 8” of overlap on each side can be used on the ends - the idea here is to avoid soil from entering the lake. If desired, the landscape cloth can be wrapped around the outside of the planting box with ends tucked between the planting box and base - this is simply an aesthetic choice that covers the trap wire. It is helpful to hold the landscaping cloth in place with clothespins or small spring clamps until planted.

Basic + Planting Boxes: Assembly Instructions
The assembly for the base of this raft is identical to that of the Open Top Base above. Once the base is complete, the avian guard should be added prior to the planting boxes. It should be skewered onto the eco composite beams and attached with hog rings. Larger hog rings (3/4”) will be needed for joints that involve 3 pieces of wire.
Planting
While assembling the raft structure is quick, planting the raft takes more time and care. Most importantly, this involves securing native plants responsibly. The best option is purchasing them from a nursery. Another good source are construction sites, where native plants are about to be removed and discarded. We have had success with a variety of native plants, but suggest blueberry and leatherleaf for shrubs. We are still experimenting with saplings, but both evergreen and deciduous trials have thrived.